Saturday, June 29, 2013

Bead and Button Bead Soup

I had mentioned in a previous post that Kalmbach hosted a bead soup swap at the Bead and Button show in honor of Lori Anderson's book, Bead Soup.

My soup was cooked by Jo Dresden.


When I first saw my soup, I was struck by the awesome focal bead. The beads and crystals Jo chose complimented the focal beautifully.

I wasn't sure how to incorporate the lighter beads and, at first, thought I might treat it as two different soups. As it turns out, the beads played together better than I imagined.

I had immediate plans for the focal and, while I let those ideas roll around in my head, I started on a spiral rope using the majority of the beads in the soup.


I love how the pale glass nuggets play so well with the light and dark crystals.  You can't see them in this photo, but I also used the small white pearls in this spiral.

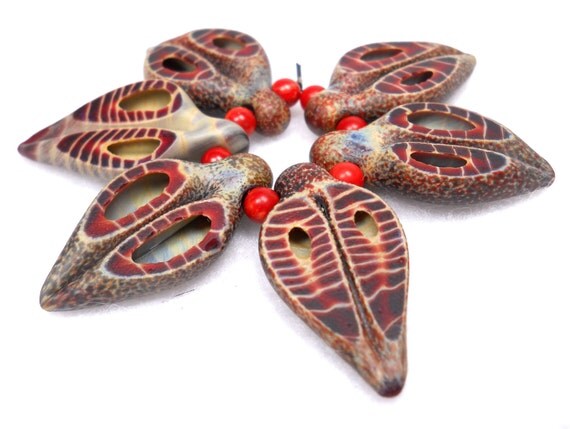
Since I had plans for the focal that came with the soup, I added a few beads by Marti Conrad to my rope.


The lighter colors of Marti's beads are perfect with the beads from Jo's soup.

Marti makes fabulous beads.  If you would like to see more of her work, check out her etsy shop.

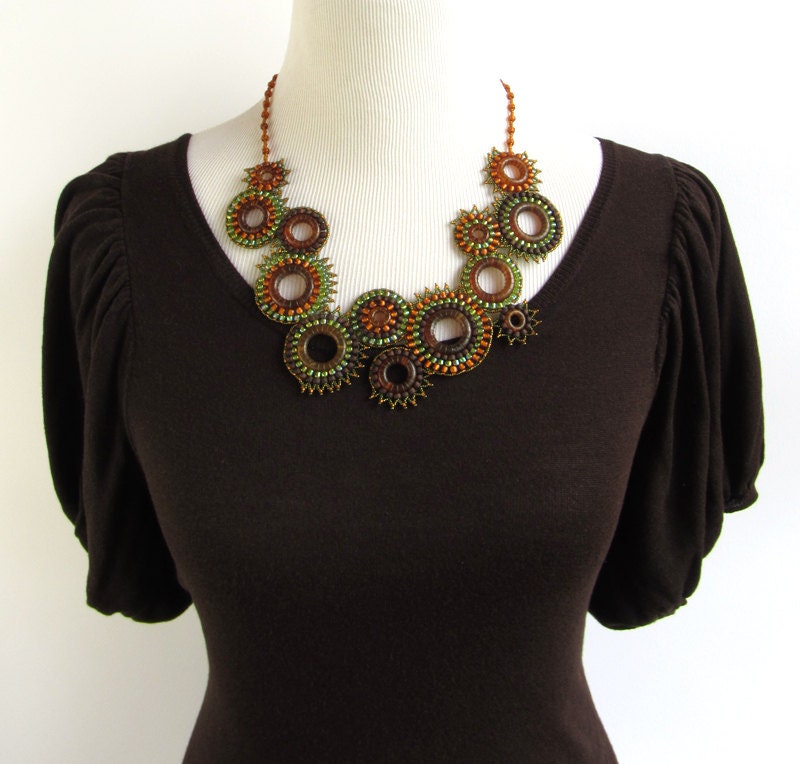
The result is a stunning necklace.


I had originally intended to embellish the spiral rope with the larger pearls from the soup.  After finishing, though, I decided that the rope was perfect as it was.  I love the different mix of beads in the spiral and the darker core beads peeking out.

You can't see it, but I used the clasp from the soup on this necklace.

My next piece uses the focal and some of the crystals from the soup.

While the necklace came together quickly, this bracelet took quite a bit of 'cipherin'.


I wanted to create something that combined the different techniques I learned this year at Bead and Button.

This bracelet is close to my intentions, but not quite there.

My original cuff, for example, had one fold formed line below the center.  Did you know that you can't always slide a piece of fold formed metal through a disc cutter?  I didn't either.

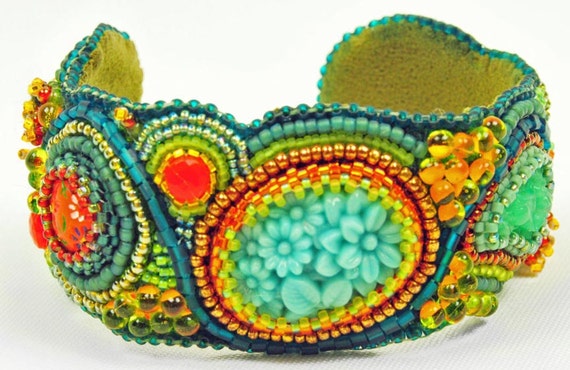
Regardless of that, and a few other mishaps, I am quite pleased with the cuff.

I was able to incorporate a bit of Eva Sherman, Sherry Serafini and Kim St. Jean into the finished piece.

I love how the rivolis sit into the cuff and have ideas for more cuffs.


I also love the flame patina.  It's  rustic and haphazard and was attained through another series of mistakes.

Basically, I didn't shake the can of sealant and the cuff looked awful after I sprayed it.  After trying unsuccessfully to scrub the sealant off, I tried to burn it off as a last ditch effort.  This patina is the result.  Let's hear it for happy accidents.

All in all, I had a fabulous time with this soup.

I was a bit surprised the the majority of the ladies who participated at the show had heard of Lori's book, but hadn't followed the Bead Soup Blog Parties online. I think it's awesome that Kalmbach was able to introduce a new group of people to the joys of bead soup!

I'm not sure if Kalmbach will be showing the results of the Bead and Button Bead Soup Parties, but if pictures are posted, I will share the link.

Thank you, Jo, for the wonderful soup and thank you, Kalmbach, for an awesome party.

Friday, June 28, 2013

Focusing on Life - 26 of 52

Wow . .we are half way through our Focus on Life challenge.  It's been a fun way to spend each week.

This week, Sally gave us a freebie - blogger's choice.

Summer has hit us in Kansas with almost 100 degree days and a great deal of sunshine.

The heat makes me remember one summer day on which my mom and I visited a local ice cream parlor.  Somehow, we agreed to bring back a cone for my dad -- an ice cream cone .. in 100 degree weather .. in a car with no air conditioning.  This wasn't our brightest moment.

One hand held my ice cream cone (which I was trying to eat quickly).  My other hand held the remains of dad's cone.  My arm was covered in chocolate goo, as was the car's seat.

The kiddo laughed when I told her the story.  Of course, she asked for a cone.


Thanks, Sally, for bringing back memories.  Please check Sally's blog to see what the other participants chose this week.

Saturday, June 22, 2013

Swarovski Bead and Button challenge

I mentioned in my Bead and Button show review that I picked up various Swarovski beads at different booths in the market place.

The beads were different sizes, different colors and a few were in different shapes.


I raided my crystal and pearl stash and pulled out beads in similar colors and shapes.

Then, I sat down and started playing.  I made a few flower motifs with the beads from my stash and from the soup.


I bought a few packs of 3mm bicones to use instead of seed beads and went to town.

The result is this bracelet, which I call "Leftover Flowers."


With the exception of the snap closure, all the beads are Swarovski.  I also used every bead I picked up at the show.

I really like how colorful it is.

I'll be posting this bracelet to Swarovski's Bead and Button Contest Facebook page.  There are only a few entries so far, but I bet more will be coming in the next week.  If you have time, take a look to see what the other participants made.

Friday, June 21, 2013

Focusing on Life - 25 of 52

This week, Sally asked us to focus on what makes us special.  Fill in the blank, she said:  "You are ________"

There are so many things that make each of us special. One of the best things about this challenge is the window it has provided into the lives of the participants.

From raising goats to painted shoes and from bread baking to clothes lines, gorgeous windows, cornerless walls, puppy eyes and amazing sketches, I've been able to see many things that make the participants so special.

When it came to myself, though, I wasn't quite sure what to photograph.  While I was debating, it occurred to me that how we see ourselves is sometimes dependent on how others see us.

Our best traits (and sometimes our worst ones) are magnified by the company we keep.  The best people in our lives are the ones who make us a bit better every day.

With that in mind, I can say that I never feel more special than when the kiddo looks at me with her eyes filled with love.


She is kind and smart and funny and she makes every day a joy.  She brings out the best in me.

So, Sally, I am a loving mother to an amazing kiddo!

Please check Sally's blog to see what makes the other participants special.

Monday, June 17, 2013

Embroidery with Sherry Serafini

On Monday night, I met a beading idol, Sherry Serafini.  I have been in awe of Sherry's work for some time and it was her work and her book, Sensational Bead Embroirdery, that made me try bead embroidery for the first time.

If you haven't seen Sherry's work, take a look at her gallery.  You'll be in beaded heaven.

Sherry teamed up with Marcia DeCoster this year for the Bead Dreams competition.  Marcia created gorgeous components for Sherry to play with.  The result is a gorgeous necklace.

So, I was really looking forward to Shery's "Rebel Cuff" class.

Three stones bezeled in peyote stitch make up the focal of the cuff.  Several ladies in the class had never done peyote and Sherry was right there walking them through the stitch and the step up, which is confusing the first few times you try peyote in the round.  I think, by the end of class, everyone was comfortable with the stitch.

I was pleased to have *almost* completed the focal during class.


The bracelet strap is made by whip stitching a piece of leather to a piece of suede.


(The focal looks a bit off center because I allowed a bit of space for the overlap on the snap.  It now occurs to me that I didn't have to do that.  At least you can't tell when I'm wearing it.)

I always think that an embroidered piece needs to be completely covered in beads.  This bracelet made me rethink that assumption.

I love how the focal takes center stage and the leather itself is gorgeous and feels awesome against my skin.

I also love the feel of the chain dangles.


I'm in love with the bracelet and so happy I took Sherry's class.

I'm ready to try more embroidery.  It's almost like painting on a canvas and the results can be amazing.

Sunday, June 16, 2013

Right angle weave with Laura Andrews

On Wednesday night, I had the pleasure of meeting Laura Andrews.  Laura is a very talented artist who uses beads and wire to create gorgeous pieces of jewelry.

Evening classes are sometimes tiring.  After beading for six or eight hours previously, sometimes it is hard to even look at a needle and thread.  Laura's cheeriness and sunny personality made it easy to start on her pendant.

Laura's "Do you Dream in Crystal" pendant captured my attention right away.  The sheer number of crystals is enough to make anyone pause.

The pendant is created with cubic right angle weave.  The varying sizes of the beads made it a bit easier, for me at least, to keep my place.

The result is a stunning ring of sparkly goodness.


There were only four of us in the class.  Three of us were familiar with cubic right angle weave and finished our pendants.

The fourth student had never done right angle weave.  Laura sat with her and explained the technique, bead by bead.  By the end, I think she had it.

Laura was also generous enough to give each of us two kits.  I combined the bright pink with the almost transparent green to achieve a bit of a contrast in my pendant.  (You can see the green thread through the pink beads, which also helps bring that softer color through the rest of the pendant.)


Laura noted at the beginning of class that thread color does make a difference.  It's the little tips and tricks that make a class worthwhile.

Laura also offered us a chance to try her Pave Beaded Beads.


These are made using right angle weave, but Laura developed a way to make each row starting with a string of beads, then adding RAW components.  Laura calls it "long right angle weave."

I can't explain exactly how it works, but it works and these suckers bead up in a heartbeat.

When you look at these beads, you would think they were beaded in the traditional RAW method.  The ""long RAW" makes these bead much more quickly, though.


I can see beading a ton of these for my Swarovski challenge.

Thank you, Laura for a wonderful class!

Saturday, June 15, 2013

Day of the Cuff with Eva Sherman

I have been cyber stalking Eva Sherman for some time now.  I started following her "Year of Jewelry" project last year and was stunned by the different techniques and styles she used.  This year's "Year of Jewelry" project has been no different.

If you have time, take a look at Eva's blog.  Her jewelry is fabulous.

When I saw Eva was teaching at Bead and Button, I jumped at the chance to take a class with her.  I couldn't decide between two of her classes, "Year of the Cuff" and "Ruins of Pompeii."  Since one taught metal  techniques and one taught wire techniques, I signed up for both -- and I am so glad I did.

I had an absolutely fabulous time in Eva's classes and learned quite a bit.  I can't wait to see what she offers next year.

In "Year of the Cuff," we made five bracelets.  I was stunned.  We spent the morning texturing, filing and cleaning.  We spent the afternoon adding patina and assembling.  Everyone in the class had a blast.

I came out of this class so excited about metal.  I have a list of things to buy and a million ideas.

I also came away from the class with several cuffs.

Eva was kind enough to let me buy another copper strip and texture it in class.  It is sitting in the middle in the back row.  I have a few plans for it.


Eva gave us access to several types of texturing methods -- an embosser, a crank corrugation machine and several texture hammers.

She also taught us how to do a heat patina and gave us many other patina options -- paint patina, alcohol ink and liver of sulfur.  I had to try all of them.

Eva mentioned that she likes students to try a technique a few times.  The first time is the "starter" piece and you learn from all your mistakes.  The second piece is the "real" piece.  I love that idea and I learned with each strip of metal that I worked with.

My second class, "Ruins of Pompeii," was another day of fun.  We learned how to braze copper wire and created these awesome curly, open bracelets.  Brazing is similar to solder, but leaves more of a bronze color on the copper.

Eva wanted us to make two bracelets, a "practice piece" and a second piece.


You can tell that I did have a better brazing technique on the second (bottom) bracelet.

In this class, Eva gave us the option of using an ammonia patina.  It leaves a gorgeous green or blue/turquoise/teal color on the copper.

Because it is a multi-day process, I opted to apply the patina at home.  The bracelet turned this lovely blue.


I brushed this one with a diluted hydrogen peroxide to make the color more green.


These bracelets look wonderful on the wrist.  Eva said she called them "Tattoo Bracelets" at first because, with a liver of sulfur patina, they look a bit like tattoos. She decided to call them "Ruins of Pompeii" because the ammonia patina makes the bracelets look like a found artifact.

I hope to make more of these.  They are fun to do and I love the end  result.

Friday, June 14, 2013

Focusing on Life - 24 of 52

This week, Sally asked us to take a picture of something green.

Several things came to mind -- money, the grass, my beloved seed beads -- but I quickly decided a trip to the arboretum was in order.

The kiddo and I, armed with our cameras, strolled along the gorgeous paths.

We found several small green plants.


And took pictures of larger vistas of green.


You can't get much greener than this.

Please check Sally's blog to see what green things the other participants found.

Fold Forming with Kim St. Jean

Kim St. Jean is a bit of a legend when it comes to metal work.

After reading her book, Mixed Metal Mania, I tried fold forming.  The results were not pretty.  Seriously, not pretty.

When I saw Kim's "Fold Form Cuff with a Bezel Set Stone" class, I knew I had to take it.

There is a huge difference between reading a book and watching Kim do the techniques.  I may have mentioned before, but having a teacher to guide you sometimes makes all the difference.

In addition to fold forming, we also created a bezel setting for a stone.  We did this with a jewelers saw and a very, very small saw blade.

I had always been scared to use a jewelers saw and was a bit intimidated.  I was both happy and surprised that it wasn't as hard as I thought it would be.  I may not be investing in a saw soon, but I won't be scared of it any more.

By the end of class, I had created something cool.


Kim was a great teacher.  You can find her books, Mixed Metal Mania and and Metal Magic, on Amazon.

Thursday, June 13, 2013

Spinner Rings with Robyn Cornelius

I have wanted to do more metal work, so my first class at Bead and Button was with Robyn Cornelius.  Robyn is a wonderful metal smith and I was very excited to take her "Spinner Rings" class.

Robyn make working with silver look so easy.  You can tell she has years of experience under her belt.  She was very helpful and guided the whole class in filing, texturing, sawing, soldering, polishing and folding.

We were all pleased with the end result.


Robyn paints the inside of her rings with liver of sulfur and achieves the amazing colors.  I had never tried that before and will be playing a bit with the idea. You can see the colors change with each brushstroke.


While my attempt pales in comparison to Robyn's, I am pleased with the result.

You can see more of Robyn's work (and glimpse the gorgeous colors of her patinas) on her website.

You can also buy Robyn's tutorials from her etsy shop.  Her waved bangle is next on my ever-growing list.

Wednesday, June 12, 2013

Chain Maille with Rebeca Mojica

This post is part of my Bead and Button review.

My first class on Monday was "Intricate Chain Maille" with Rebeca Mojica, founder of Blue Buddha Boutique.

A few weeks prior, Rebeca had emailed all of us asking if we would like to do some prep work (opening and closing rings) for the class.

I jumped at the chance to get started (no pun intended), signed up for the prep and received the kit in more than enough time to open and close the rings.

Because "Intricate Chain Maille" uses a slightly bigger version of Rebeca's "Coiled Butterfly" as a base, Rebeca gave us the option of starting that weave before class.

I made one butterfly using rings close to those in the magazine instructions.


I made a second one using the rings from the kit.  I loved the way it looked, so I added a clasp and wore it for a week or so before the show.


(You can find "Coiled Butterfly" on Blue Buddah's website here or in the Fall 2012 issue of Wirework magazine.)

I think everyone in the class took advantage of Rebeca's offer and we were all sailing into the pattern very quickly.

During the class, Rebeca made sure to check on each one of us and help us through the various stages.  She definitely knows her chain maille!  

After completing "Coiled Butterfly," we added various rings in the middle and around the edges, building on each layer of rings to make a thick cuff.


I veered a bit off path and used bigger rings than Rebeca had in her samples.  As a result, my cuff does not lay flat.  I don't know if you can tell, but the middle part sticks out a bit and the rest of the bracelet tapers from the middle.


I absolutely adore it!  It is bold and thick and awesome!

I loved this cuff so much that I bought another kit in copper, blue and turquoise.  (This one is for my mom, so it may not be as pointy in the middle.)

I cannot tell you how pleased I was with this class.  Rebeca was wonderful and the time just flew by!

If you are interested in chain maille, check out Rebeca's store, Blue Buddha Boutique.  Blue Buddha offers a wide variety of patterns and kits.  (I want to try about ten of them.) 

You can also find Rebeca's book, Chained, on Amazon or on the Blue Buddha website.  Blue Buddha also offers kits for most of the patterns in the book.

Tuesday, June 11, 2013

Bead and Button 2013 - what I didn't buy (but really wanted to)

When I posted about the Bead and Button show yesterday, I showed you the few beads that I bought.  I realized today that I should have also shown you the beads I didn't buy (but really, really wanted to).

As I mentioned in my last post, I didn't buy as many kits or patterns as I had wanted because I wasn't sure that I would actually bead them.

I would, however, like to share them with you.

Okay, I can't share every single one.  I would be typing all day.  Instead, I will show you a sampling of what appealed to me and what I will keep in the back of my head for a rainy day.

I loved Hannah Rosner's patterns, specifically her Atlantis Bracelet.

Hannah's photo from her etsy listing

I loved the way the bracelet curved and captured another row of beads in the middle.

You can find more of Hannah's patterns, including her Royal Ruffles pattern (another favorite), in her etsy shop.

I was disappointed that I couldn't take Cindy Holsclaw's Tila Garden Pendant class or her Cosmic Nocturne pendant class.  I love Cindy's work and I've been eyeing the Tila Garden pendant for a while now.  It looks amazing!

Cindy creates amazing geometrical shapes with her beadwork.  Recently, she has been developing beaded molecules.  This chocolate molecule, of course, is my favorite.

Cindy's photo from her blog

You can find these patterns and more on Cindy's website, Bead Origami.

I'm a big fan of Marcia Balonis and her booth did not disappoint.  Marcia does amazing things with spirals.  I've used her Different Kind of Spiral pattern before and have my eye on her Magic Twist Spiral.

Marcia's photo from her etsy listing

I also have my eye on her Tila Double Wide bracelet and her Chunky Spiral 2 pattern (that is not yet on her website, but should be soon).  You can find Marcia's patterns on her website or in her etsy store.

I have always loved Met Innmon's patterns, but seeing the samples in person was amazing.  I fell in love with her Ribbon Arches bracelet and have been lusting after her Crystal Triad pendant for some time now.  I'm not sure if Met sells her instructions separately, but you can find her kits on her website.

I had not seen Kelly Angeley's work before, but I was so glad I stopped by her booth.  Her work is so full of color and cheer.

Seriously, how can you not smile when you see this kit?

Kelly's photo from her etsy listing

I love her Anemone bracelet and was bummed that I wasn't in able to take that class.  (You can see the Anemone bracelet here, just scroll down a bit.)

You can find kits in Kelly's etsy store.

I've been reading Charlene Abrams' blog for a while now and was delighted to meet her in person.  I was instantly taken by her Cuboctahedral Bouquet pattern.

Charlene's photo from her craftsy listing

I am also eyeing her Pearl Ruffle bracelet pattern.

You can find more of Charlene's patterns in her craftsy shop.

While in one of my classes, I met Laura Luepke from the Verdant Edge.  She is an amazing bead weaver and her sense of style and color are amazing.  Laura was wearing the necklace she submitted for the Beadwork Beaded Bead contest and it was stunning!

Laura will bezel just about anything and create a gorgeous work of art.

I love this necklace.

Laura's photo from her etsy listing

Laura doesn't write tutorials, but you should still check out her etsy store.  Her work is amazing.

I also ogled the work of several bead artists at the show marketplace.  I can't tell you how many amazing artists were in the market place.  Again, I can't show you everything, but these really stood out to me.

The first was Sylvie Lansdowne. I met her last year and *loved* her head over heels kits.

This year's kit is a fairy.

Sylvie's photo from her website

She is adorable.  It's a doll and a bracelet -- all in one.  I really want to get one for the kiddo.  She would love it.

Sylvie creates the lampwork head, hands and feet for her dolls along with other awesome beads.  You can find more on her website.

I loved Jen Gordon's beads.  She is a self taught artist and makes these cute little gnome beads.  At the show she had several of these zombie gnome beads.  I loved them.

Jen's photo from her etsy listing

You can find more beads in Jen's etsy shop.

I really loved the colors in Harold Williams' glass beads.  Harold is one of those people who can make glass look like something other than glass.  I think I touched every single bead on his table.

I loved the different shapes of his beads and the patterns he created in them.  I could have easily gotten lost in the beads.

These are a favorite.

Harold's photo from his etsy listing

You can find more of Harold's beads in his etsy shop.

Finally, I loved Catherine Tetrault's fused glass pendants.  Her spiderweb collection first caught my eye, but I really was in awe of her metalpoint pendants.

Metalpoint is a old metal on paper drawing technique that Catherine has incorporated into her fused glass work.  The results are stunning.

Catherine's photo from her website

You can find more of Catherine's work on her website or in her etsy shop.

Whew!  I hope that's not too much beady goodness for you.  (It certainly isn't for me.)  If you have some time, please check the shops and websites above.  I promise that you will not be disappointed.

Tomorrow (hopefully), I will start my class reviews.

Monday, June 10, 2013

Bead and Button 2013 review

Last year, I neglected to write a review of my first experience at the Bead and Button show.  I was completely overwhelmed by the shear enormity of the convention, my classes, the Meet the Teacher night and the shopping (oh my, the shopping).

I needed time to process the week and, unfortunately, lost my "window," so to speak.  I didn't really blog about it and regret that I didn't.

This year, I was more prepared, less overwhelmed and enjoyed the show even more.

This is a pretty big post, so I've bolded section headings.  If you want to skip to a section, feel free to scroll down.

Classes

I am currently posting on my classes and will update this section with links as I post

Chain Maille with Rebeca Mojica
Spinner Ring with Robyn Cornelius
Fold Forming with Kim St. Jean
Metal and Wire with Eva Sherman
Right Angle Weave with Laura Andrews
Bead Embroidery with Sherry Serafini

Experience with tools and TSA

This year, I took a only a few seed beading classes and concentrated on metal working.  This meant that I had to bring a few tools with me.  While all of the teachers brought supplies for the class, I did need a few different pairs of pliers, my hole punch and my wire snippers.

The tools I brought with me were under the 7 inch limit set by the TSA.  I packed my tools (including my thread snippers) in a separate bag that was easy to remove from my suitcase.  In the security line, I emptied the bag of tools into a separate plastic bin.  This way, all the metal pointy things were easily identifiable and searchable by TSA and there was no reason to rifle through my suitcase.

At the show, I bought a riveting hammer.  At the Milwaukee airport, I was pulled aside by a TSA employee.  He explained that the hammer was over 7 inches and that he could not allow it on the plane.  He made sure that I understood the policy and thanked me for separating the tools from the luggage.  He was very kind and polite. 

He mentioned many beaders visit Milwaukee for the show and TSA does not want to upset anyone and hoped that explaining the policies would help us in the future.

I was impressed by this employee.  I have heard many TSA horror stories and was happy to have a positive experience (even though I lost my hammer).

So, if you are flying with tools, separate them out from your other luggage and leave your hammers at home.

Monday night bead soup party

Monday night, Kalmbach Publishing sponsored a small bead soup swap in honor of Lori Anderson's book, Bead Soup.

About fifteen of us gathered in the meeting area of the Hyatt and put our packages of beads into a large crock pot.  In turn, we each drew a package.  Everyone had a great time looking at their soups and admiring all the different soups

My soup was put together by Jo Dresden.


I was immediately taken by the colors of the pendant and crystals.  

After I opened my soup, Jo came over to make sure I liked it.  How could I not?  Those are very much my colors and, of course, the more bling, the better.

Not only did I forget to photograph the soup I cooked up, I also didn't write down the name of the person who received my soup.  She said she would email a photo of her creation, so I will post it when I receive it.  (If you are the recipient of my soup and you are reading this, please leave a comment or email me and I will include your name if you would like).

Everyone *loved* their soups and I would say that the event was a rousing success.  Kalmbach repeated the event on Tuesday night and I would venture to guess that it was just as fun.

Just as in Lori's bead soup blog hop, the participants are supposed to create a piece of jewelry with their soups and send a photo to Kalmbach.

Look for my piece in a few weeks.

Meet the Teachers

Last year, I wasn't sure what this event was and almost didn't buy a ticket.  Wow .. was I surprised.

Meet the Teachers is a huge event.  Each instructor has a table and displays he patterns, jewelry samples, books, etc.  It is a festival of eye candy.  Bead and Button offers classes in a wide variety of techniques and Meet the Teachers is a great place to see the specialty of each teacher and marvel at all the different materials used.

The line for the event stretched around the Delta Center and was in place almost a half hour before the start.  Learning from last year, I planned to wait until about ten minutes after the doors opened before going in.

It is a treat to chat with the teachers and look at the patterns and kits for sale.  Many of the teachers love to know if you have their books or if you made their projects.  

The kits and patterns are a huge temptation, though.  Last year, I bought tutorials and kits that are still sitting unbeaded.  This year, I took wrote down the tutorials I was interested in and took cards from the teachers.  When I get inspired or am in need of a new project , I will know where to look!

Bead market

Thursday night marked the preview of the Bead and Button market.  I had browsed through the vendor list and marked which booths I wanted to visit.

While wandering past the Fire Mountan Gems booth, I was reminded of the Swarovski scavenger hunt.

Basically, Swarovski sent beads to twelve or so vendors and asked us to find those vendors on the shopping floor, gathering a bead or two as we went. 

I ended up with this mix of beads, including a clasp, crimps and crimp covers.


Like the bead soup challenge, we are supposed to create a piece of jewelry using mostly Swarovski  beads.  Hopefully, I will have something to show you soon.

I also passed by the Toho booth and noticed that Toho was also host a bead challenge.  I was lucky enough to enter.  Toho provided  a delicious mix of beads and asked participants to create something with only the beads provided.


I couldn't resist the colors and had to sign up.

Honestly, for someone who had resolved to stay away from challenges for a while, I certainly got myself involved in several.  If you have been counting, that's three in less than a week.

Of course, I also did some shopping.  

I bought these gorgeous copper components from Patricia Healey.  Patricia is famous for the delicious red and orange colors she achieves on copper.  I have no idea how she gets these gorgeous colors, but I am sure glad that she does.


This is a linked pendant chain.  You can swap pendants out easily.


You can find more of Patricia's pendants and charms at Artbeads or Lima Beads.

I grabbed these from Melanie Brooks of Earthenwood Studio.


I love that little zombie face.


You can find more of Melanie's pendants and beads on her website, in her etsy store or at Fusion Beads.

Fnally, I could not resist this treasure from Eriko Page.


If you can believe it, this is polymer clay.  I was struck by the vibrant colors and how Eriko blended the red, orange and yellow into something so gorgeous.

Each of Erika's beads is just as stunning and many look like small oil paintings.  

I picked up matching polymer leaves and a few lovely flowers.


Eriko has an etsy site, though there are no items available right now.  I did find her beads at Sonoran Beads. Definitely take a look.

If you are curious about other things I found in the marketplace (and really wanted to buy), head over to this post.

Contemporary Geometric Beadwork

Kate McKinnon had mentioned a Contemporary Geometric Beadwork meet-up on facebook, so I wore my pagoda bangle, even though it is not quite finished.

It is a bit further along than it was in this post and, as Kate mentioned, it is wearable in all stages of beading.


I was surprised by the number of people who both complimented my bracelet and said, "Contemporary Geometric Beadwork, right?"  Kate, you've started a trend!

In addition, I got to see several gorgeous pieces made by Shelly Gross, whom I had seen on Facebook (and whom I got to know during a few of my classes).

I met Barbara Briggs and saw her Sea Dragon wrap in person.  It is stunning!  Barbara has that and many other patterns inspired by Contemporary Geometric Beadwork in her etsy shop.

I also had an opportunity to chat with Suzanne Golden.  She was wearing several of her beaded bangles and they were all popping with color.  Suzanne just has a way with bright colors and her work is fabulous!

Whew!  This might be my longest post ever.

Remember, I'll be reviewing my classes later this week and I will update this post with the links.