Each month, Erin picks a set of beads that coordinate with a color palette and invites her readers to create something using those beads. A few months ago, Erin started partnering with guest bloggers. It's always fun to see how two people use the same set of beads.
I was honored when Erin asked me to be her partner for the August Pretty Palette challenge. Erin has such a way with color and design. She can find inspiration in virtually anything: color, literature, music, and travel, just to name a few.
The inspiration for August comes from notion:creative, which showcases street art.
Erin picked a variety of beads
I'm so excited to play!
You are more than welcome to play along. Erin offers a link up every month.
Today, I am so excited to host my first ever blog hop!
About a month ago, I gave away several 9 inch portions of shibori ribbon.
Shibori ribbon is made by Glennis Dolce, who uses a traditional technique to dye and create pleats in silk. The result is a gorgeous ribbon with a ton of uses.
Definitely check out Glennis's bigcartel shop or her etsy shop. The bigcartel shop also offers downloadable instructions and kits.
In preparing for this hop, I looked at many examples of projects using shibori ribbon. You can see a sampling on my pinterest board.
I was taken with Glennis's shibori flowers and decided to try my hand at making one.
I paired the shibori flower with the flower part of Lisa Kan's Corsage Cuff, published in the February 2009 issue of Beadwork magazine.
I liked it so much that I made a hair clip.
The kiddo was kind enough to take an "action shot"
I just love the folds in the ribbon and how they move in and out. I will definitely be playing with this ribbon more in the future.
Please take a few minutes and hop around to the participants. I know you will love what they made.
First, I would like to extend a big "thank you" to everyone who left a comment. This will be my first time hosting a blog hop and I was a bit scared that no one would want to play.
I am so grateful to all of you that picked six winners instead of five and give away the ribbon I was going to keep for myself. (I ordered another for me to play with.)
Congratulations! I have your packages ready to go and will send them out as soon as I get your addresses. (If you don't have an email from me already, please let me know.)
Also, a few people commented that they had ribbon and wanted to play:
Christine (I sent a ribbon to Christine after our email conversation) Sharyl Therese
thisgirl
I am so excited to see what everyone does with their ribbons.
Last week, I shared a pendant I made with shibori ribbon.
I had never worked with that type of ribbon before and really enjoyed it.
A few people commented that they had not seen shibori ribbon before and were interested in trying it out.
After an email conversation with Christine Altmiller, I decided to host a shibori ribbon challenge.
If you haven't played with shibori ribbon, you are in for a treat. Shibori is a silk ribbon with accordion like folds running down the length of the ribbon. You can stretch it (width wise) or scrunch it or both. I've seen it used mostly for bead embroidery, but I think it could be used in many other ways.
I have 5 pieces of shibori ribbon up for grabs. Each piece is 9" in length -- perfect for a bracelet or for a couple of pendants.
The rules:
* Leave a comment below if you would like to play -- be sure I have a way to contact you
* You do not need to have a blog. I would be happy to show your work on my blog
* You do not have to be a bead weaver or learn to embroider. I would love to see different ideas on how to use the ribbon.
* You have to use the ribbon in some way, but you don't have to make a piece of jewelry if you don't want to.
* I will pick winners randomly from the comments the morning of Monday, March 10 and (hopefully) send the ribbons out the next day.
* If you are not chosen, but have shibori ribbon, you are welcome to play along.
* The reveal will be Monday, April 14.
* Above all, have fun and try something new!
If you've never worked with shibori ribbon and are wondering exactly how to use it, I found this link helpful when I started working on my pendant.
I have also started a pinterest board to spark our imaginations.
Many times, she invites her readers to join her on an inspiration blog hop challenge. Some of my favorites creations have stemmed from Erin's challenges.
For this year's challenge of music, Erin asked us to pick a seminal year in our lives or a year that impacted our lives in some way, then pick a song from that year to inspire us.
This year marks my grandparents' 70th anniversary. They were married in February of 1944. I decided to pick a song from 1944 in honor of them.
"My Heart Tells Me," sung by Glen Gray, was top of the charts in February, 1944, but that song didn't seem to capture 70 years of marriage. I opted instead for "Swinging on a Star," sung by Bing Crosby. It was top of the charts in August and September, 1944.
I liked the playfulness of the lyrics:
Would you like to swing on a star
Carry moonbeams home in a jar
And be better off than you are
Or would you rather be a mule?
The part that really struck me was "be better off than you are." The right person makes you be better than you are. My grandparents spent a lifetime making each other -- and all of us -- better every day.
This is one of my favorite photos of my grandparents, taken by Mae-Belle Photography.
To celebrate their 70th, my mom and her brothers and sisters threw a party. I may have mentioned before, but my mom has 12 siblings. There are 32 grandchildren and over 30 great grandchildren.
Not everyone was there, but it was quite a party.
Words can't express how lucky we all are to have my grandparents still in our lives.
But, back to my song.
I wanted to capture the playfulness of the song and, at one point, wanted to bead a swing to hang from a star. Well, you can probably guess how that turned out.
After a few ... several ... too many tries to mention, I settled on this bead from Genea. I love the star on the front and the moon on the back. It was meant to be.
Speaking of Genea, she creates jewelry with a playful style. How she combines colors, textures and her beautiful beads in such a fabulous way is beyond me, but I decided to give it a shot.
I started with a celini spiral.
I added a few copper swirls and mixed some of Genea's wingdings with clay beads from Staci Louise and a glass bead from Sue Beads.
I am pretty enamored with how it came out.
If you haven't already visited these ladies' shops, please do so. You can find Genea here, Staci here and Sue here.
While I was fiddling with the necklace, looking at this focal or that bead, I also made earrings.
I paired small lengths of chain maille with these cute charms from Miss Erin herself.
Copper didn't work so well with Erin's charms, so I used a bit of patina and gilder's paste to give the rings a (hopefully) celestial look.
As a side note, I finally got the hang of the violet patina from Miss Fickle Media. The color is just swoon worthy, though too purple for my earrings. Hence the gilder's paste.
This time around, our main stitch was netting and we had a choice of three other stitches: spiral, chevron and chenille.
This was a hard challenge for me. I rarely use netting and I wasn't sure where to start.
I tried to bezel a rivoli with netting. Unfortunately, I started with 46 beads, which put me at 23 beads around the outside. An odd number of beads doesn't always work. I ended up looping the beads a second time to come out even.
So, the netting didn't work out as I had intended. It still looks nice, though.
I thought about making a netted base for my pendant, but remembered this tutorial by Nancy Dale. Nancy's Trellis Necklace was one of our Beading Babes projects a few years ago. I have wanted to make another for some time and this was a perfect opportunity.
Nancy's design starts with a right angle weave base, then adds a netted overlay. The result is a gorgeous rope. It take a bit longer to bead, but it's so luxurious that it's more than worth the time.
If you haven't looked at Nancy's tutorial, run to her shop. She offers many other gorgeous tutorials in addition to the Trellis Necklace.
I love how it turned out. I wouldn't normally gravitate to blue and purple, but it works so well.
I wanted to try another stitch as well, and found a design by Yvanne Ham that used 4mm beads in a chevron chain. Yvanne's "Chevron Chain with Flowers" was published in the April 2007 issue of Bead and Button.
Looking at the bracelet, I would never have guessed chevron stitch, but it is and it makes a wonderful pattern.
Finally, I decided to take a stab at a netted pendant again. This time, I took inspiration from Sonoku Nozue. Sonoku's book, Japanese Beadwork, is fabulous. I used her "Snow Crystal" brooch as a basis for this pendant.
There are three layers of netting in the pendant and it looks fabulous.
I finished the necklace with a cellini spiral and ribbon.
Therese and Christine, thank you for another lovely challenge.
It's so easy to fall into a "beading rut." I need constant reminders that other stitches exist. :)
Please take some time to visit the other participants. I know you will see some beautiful creations.
I love this time of the year. Erin Prais-Hintz's Challenge of Color is an event I have been looking forward to for several years now.
Each year, Erin chooses a color palette or palettes for the participants to play with and the results are always amazing. The bracelet I made last year is still one of my favorites.
This time around, Erin asked us to either choose an existing palette from colourlovers.com or create one with the tools on the colourlovers website.
There was a catch, though. Erin asked that we choose our colors by names, such as "curry chicken" or "hot chocolate" and, after choosing the first color, we had to use the last word in each color's name as the first word in the next color's name.
The colors are:
yellow silk sari
sari full pink
pink lemonade
lemonade stand
stand by your man
This challenge was a bit rough for me. I made this palette, had the perfect pendant and a great vision, but couldn't make it work.
Since I was having so much trouble, I decided to change directions. I scrapped what I had and started with a different pendant, this time one by Nancy Schindler Adams. I created a new palette.
The colors are:
burnt peach
peach blossom
blossoming blue
dark blue green mist
mist of unrest
I was going for an "earthy" theme and I love turquoise and brown together.
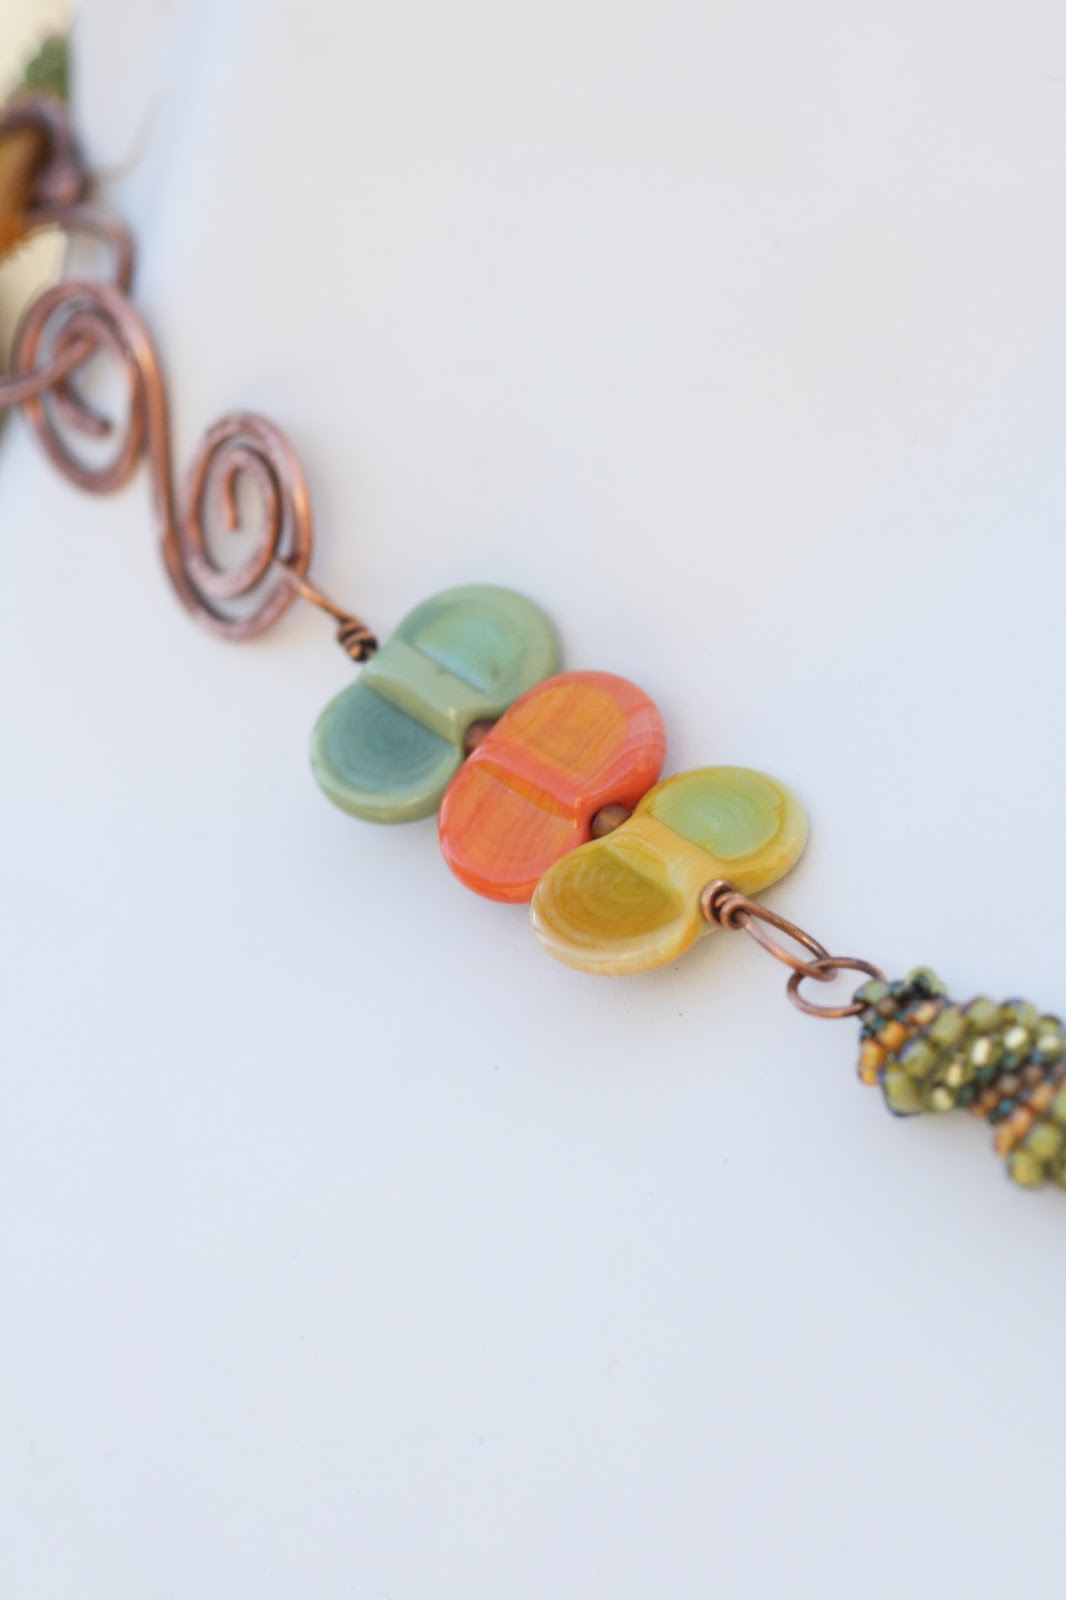
I decided to play to my strengths. I was already short on time and didn't want to be scrambling at the last minute. As has been my habit recently, I combined bead weaving and chain maille.
Diana Ptaszynski, from Suburban Girl Studio, is hosting a fun, Halloween inspired blog hop. How fun is that?
When Diana posted the sign-ups, it was a no-brainer for me. I knew immediately what I wanted to do.
About a week before, I purchases these cute little ghost charms from Nancy Schindler. I knew exactly what they needed and asked my friend Sharyl to make a few components for me.
Sharyl created two sets of round charms -- one set similar to a harvest moon and one set more "Halloweeny."
I used the "Halloweeny" set with Nancy's ghosts.
The charms turned quite a bit when I used jumprings to attach them to the earwires. To solve this, I made custom earwires so I could attach the charms directly to them.
I love how these look together.
Nancy periodically adds beads and charms to her shop. Watch her blog for updates.
I wanted to make something special to compliment the harvest moon charms Sharyl made and was excited to see this pattern from threadabead.
These little witches beaded up quickly and look perfect with Sharyl's moon charms.
You can find more of Sharyl's components in her artfire store. She creates beautiful components in all shapes and sizes AND she has finished jewelry as well.
In addition to the earrings above, I made two Halloween necklaces for Christine Altmiller's Rolling Blog Hop. Christine sent us vintage spools, asking us to make something with them.
I'm never sure how beadwoven charms or beads fit into the "art bead" category, but I love how the spools turned out and wanted to show them to you.
A few months ago, Christine Altmiller, of One Kiss Creations, found a few times at an antique store and decided to host a blog hop.
She asked several of us if we would be interested in using the items she found, but didn't tell us what the items were. Always up for a challenge, my answer was an enthusiastic "yes!"
When I received the package, I was a little mystified and a bit excited. Christine sent us vintage wooden spools along with other beads she thought we might like.
(Of course, I had painted one of the spools before I remembered to take a picture.)
Here are the other beads Christine sent.
In a note, Christine mentioned that she liked "the idea of spools and thread and how we all have that common thread running between us in the blog world." I thought that was such a sweet sentiment!
As I was looking for ideas, I came across this craft, which uses thread and spools to make cute little monsters. I immediately started playing around with the idea and came up with these.
I started with Frankenstein's monster and used Gwen Fisher's DNA double helix tutorial to create the beaded portion of a necklace.
I thought the DNA helix was perfect for the monster. Luckily for me, Gwen's video tutorial was made using Doceri software and it is so easy to follow.
I also wanted to incorporate a bit of chain maille, so I made a variation of Rebeca Mojia's Lancelot bracelet.
This is a fun way to embellish helm weave. The instructions can be found in Rebeca's book, Chained.
I used brass rings when I made this and could not get the brass to patina with liver of sulfur. I then opted for an ammonia patina.
(By the way, ammonia, salt, and annodized aluminum do not mix well. I had to replace most of the purple and pink rings and chalked this up to a learning experience.)
It was worth it, though.
I made the pendant removable, for those non Halloweeny occasions.
Next, I added some orange to the seed beads Christine sent to make a cellini spiral.
I matched the spiral with a helm weave chain.
This finished product is another great Halloween necklace.
I really love this one.
I have a few ideas for the last spool, but it's getting close to Halloween and I wanted to show these to you while they were still seasonal.
I'll probably have another spool post for you in a month or so. :)
Christine, thank you for the opportunity to participate. I had a blast with these.
This is a rolling blog hop, so the posts will be sporadic. Christine was generous and gave us two months to complete our pieces and post.
Janet, from Honey from the Bee, posted her creation a few weeks ago. If you are interested, you can see her beautiful necklace here.
Sharyl specializes in metal components, while Shirley does wonders with seed beads. These ladies combined their pieces into a kit and invited their readers to play along.
Of course, I didn't think to take pictures when I received my components.
The beaded component I received was the "d" shaped one in the top left of Sharyl's photo.
The metal components I received were the dark copper circles in the top left of Sharyl's photo.
Sharyl also sent a clasp component that I'll show you below.
I'll be honest. I had no idea what to do with these components. I knew I wanted to use them all in one piece, but wasn't sure where to even start.
The copper circles were slightly domed. I put them back to back and wondered if I could attach them somehow. Then it hit me -- I could bezel them.
I chose colors that complimented Shirley's component.
The pendant is reversible. Unfortunately, I didn't take full advantange and use different colors on the front and back. I will next time, though. :)
After a while of staring at the pendant, I came up with the idea to connect it to Shirley's component.
The beads I used don't quite match, but it's hard to tell.
I *loved* the completed pendant and really wanted to showcase it, so I made a simple chain of half persian 4 in 1 to complete the necklace.
You may not be able to tell, but I changed the way the chain attaches. In the close up above, the chain attached at the sides of the pendant. In the photo above, it attaches at the middle. I like the second way better.
I used the other of Sharyl's components as part of the clasp. I created the hook on the right side and was able to slide it into the middle of Sharyl's component on the left.
I love the way this turned out and will be calling on Sharyl for more of her domed circles. I can see several of these in the future.
Sharyl and Shirley, thank you so much for the components and the challenge. I had fun and am so happy with how it turned out!
Please take some time to visit the rest of the participants.