Friday, February 28, 2014

She Made/She Made - February 2014

For the past year or so, Therese Frank and Christine Altmiller have participated in a monthly She Made/She Made, using beads they exchanged when they met.  It's been fun to watch and to read about what each of them made with the same beads.

A few months ago, Therese found these awesome clay faces at the Kentuck Festival of the Arts.


They were made by Susan Clayton and are just amazing to see.

Therese bought a few extra and asked six of us to join them for this month's She Made/She Made.  I am honored to be in that group.

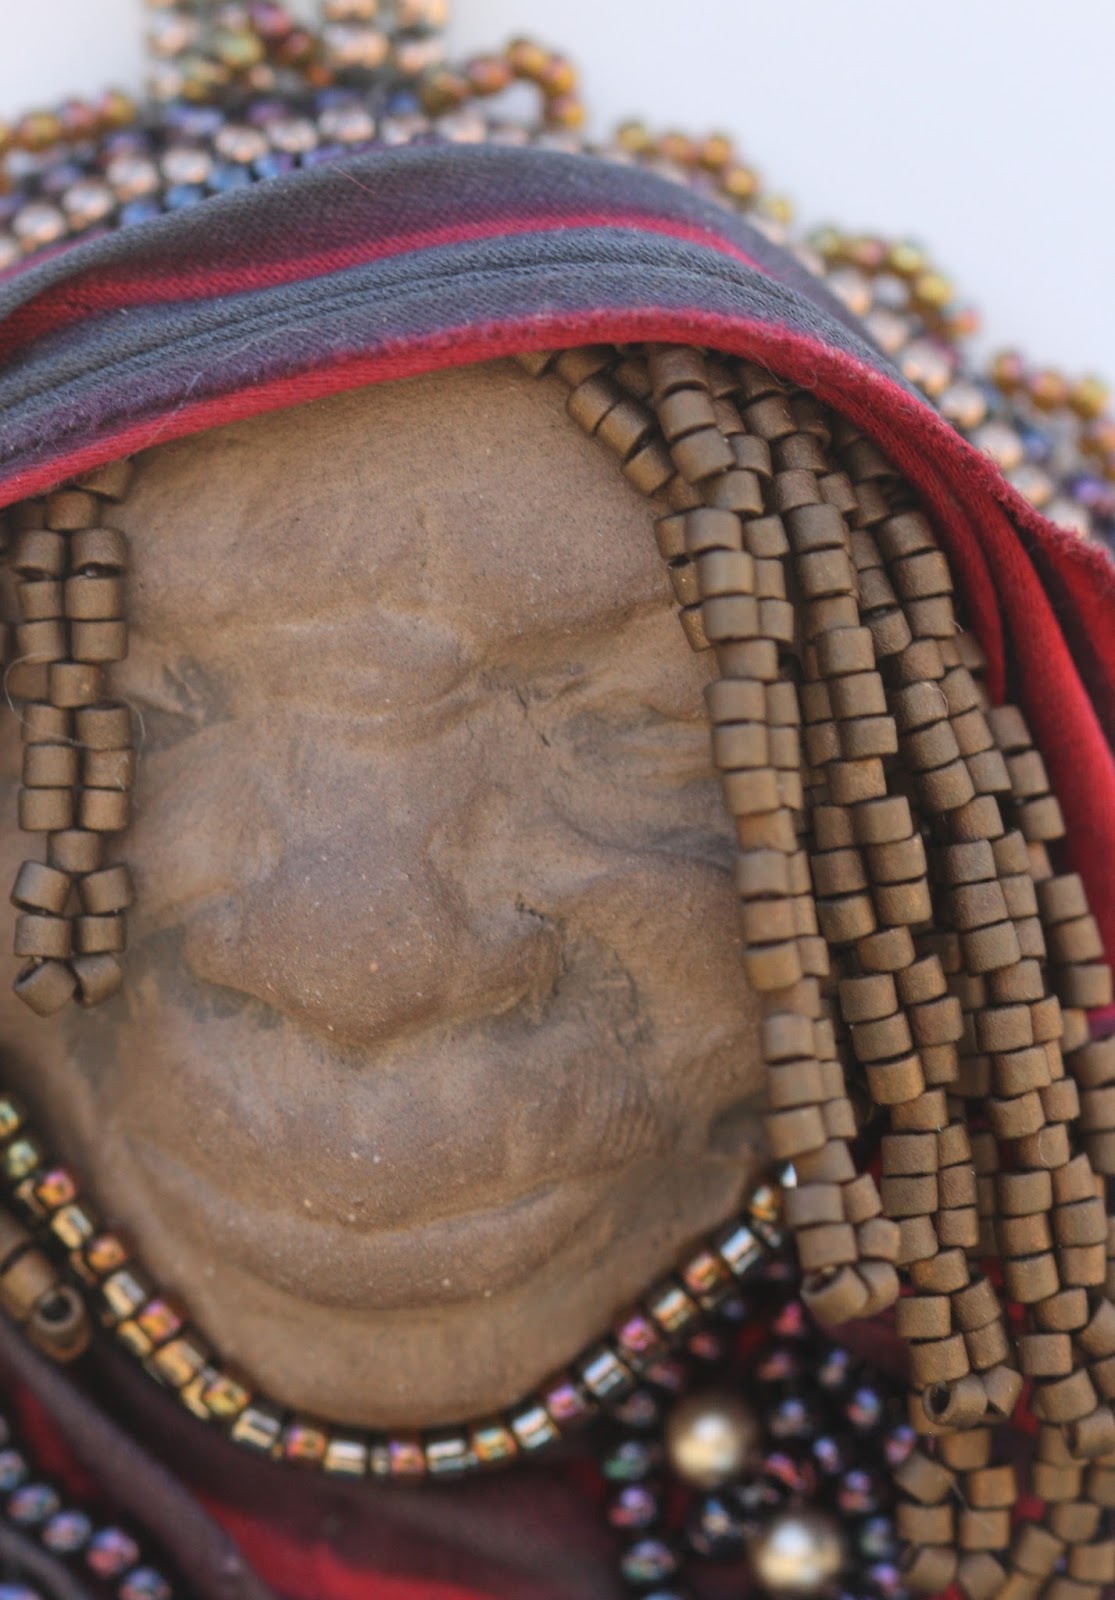
When I received the face, I couldn't stop looking at it.  There is so much character in that little face.

I immediately envisioned a wise woman or elder and wanted to create something that did justice to Susan's beautiful work.

It was the perfect time to try working with shibori ribbon.  I love the texture created by the folds of the ribbon.  With a bit of practice, I was able to shape the ribbon around the face.


A bit of embroidery and I was done.


Of course, after I cut the oval shape out, I noticed the face was a bit off center.  I guess she's looking at something.  :)

I wanted to keep the rest of the necklace simple, so I layered strands of chain and ribbon.


Therese and Christine, thank you so much for letting me play along with you this month.  I really enjoyed working with the face.

Please take some time to see what the other ladies did with their faces.  You won't be disappointed.

Therese Frank - our hostess
Christine Altmiller - our hostess
Tanya - you are here
Cynthia
Alicia


Friday, February 21, 2014

Fun with polymer clay beads and pendants

Recently, I met my friend Sharyl, from Sharyl's Jewelry for lunch and she was kind enough to invite me to her home to see her work space.

Sharyl is a multi media artist/designer who creates gorgeous jewelry and beautiful metal components. Lately, Sharyl was bitten by the polymer clay bug and she has been creating fabulous clay components.

While I was visiting Sharyl, I picked up a few things and she gifted me a pendant.

I knew exactly what I wanted to do with it, which is unusual for me.

I made a cellini spiral and started a few lengths of chain maille and started them in an ammonia patina.

Unfortunately, the blue color from the ammonia wasn't quite what I wanted. It's gorgeous though, and I have other ideas for it.

I went back to the drawing board and dug out ribbons, chain, leather, and anything else I could find.

After several backs and forths, I settled on leather.

Sharyl does an amazing job with color on all her components and I love how the color and texture play off of each other and the leather.

You can find a similar pendant (with a Kansas wheat coloring) here. (But only if you hurry, this one is on my wish list.) :)

While I was contemplating how to finish the necklace, I started browsing though my (not so small) collection of Sharyl's components.

I found that her metal components worked well with her clay pieces and made a pair of earrings.


The large rings are from Miss Fickle Media and were the perfect size.

I loved how these looked and went to town!


Sharyl mentioned that the products she uses on the metal components are different than the ones she uses to color the clay. I would not have imagined that, as the colors compliment each other so well.

Right now, I've got my eye on these links and these charms. I think they would look so cute together.

When I ran out of metal links, I tried something else.


I love how these look like little flowers. I couldn't decide whether I should hang little drops from the bottom or not, so for now, they are plain. I might go back and add something later.

You can find Sharyl's creations in her artfire store.

Check out the polymer clay section of her store for more clay components.

You can find Sharyl's altered metal components here and her handmade metal components here.

Saturday, February 15, 2014

Chain Maille Bracelets

For the past few weeks, I've been beading several special projects.

The first was my new year's necklace.  I couldn't be more thrilled with how it turned out, but it went through more than one reconstruction.

I've also been working on a something for a special February edition of She Made/She Made, hosted by Therese Frank and Christine Altmiller.

I know, you can't stand the wait, can you?  I'll give you a sneak peek.


Check back on February 28 for the reveal.

Finally, I've been working with components made by Sharyl from Sharyl's Jewelry.  Another sneak peek?  Okay, since you asked.


I plan to share my creations using Sharyl's components next week, so stay tuned.

In the mean time, I've managed to complete a few bracelets.


From left to right, they are:

Sleek Cuff - I love how this turned out.  It's a quick pattern (it took me one afternoon to complete) and looks fabulous.


Double Cylon bracelet - This was also a fun bracelet once the final step clicked.  This version is two lengths of cylon weave joined together.  I love how it looks in copper and brass.  


Fire Wyrm - This might be my new favorite weave.  It is a different spin on full Persian and I love how it looks.  This one is in all copper, but I could see adding a bit of color.


Dragonscale - I think I started this bracelet around Thanksgiving.  It's one of those weaves that takes a long time, or at least it seemed to.  I finally made myself finish it and I love how it looks.


Of course, all of these patterns came from Blue Buddha.  (No, I don't work there, even though it seems that I'm plugging their tutorials every week). 

I still have those dragon's eye pendants on my table, so hopefully, I'll have some other finished pieces to share with you soon.

Thursday, February 6, 2014

Dragon's Eye Pendants

I was excited to see the pattern for Lisa Smeltzer's Dragon's Eye Pendant at Blue Buddha Boutique.

Blue Buddha marked this as an expert pattern and I could see why.  You need to know European 4 in 1 and half Persian 3 in 1 *very* well and you need to know how to join the edges.  A few of the ring placements are very tight as well.

Since I knew it was a hard project going in, I went slowly and checked the pattern every 4.5 seconds to make sure I was doing everything correctly.

The first part, European 4 in 1, was straight forward, as was the Persian edging.  The joining of the edges, though, was another story.

After more attempts than I care to admit, I started from scratch and found that it was easier for me to join the base before adding the edging.  After that it was smooth sailing until the very last step.

The front of the pendant looked great, but I couldn't get those pesky rings to work on the back.

This is the front:


This is the back:


Do you see how the violet rings are sitting on top of the copper rings?  That isn't correct.

I tried several times, but resigned myself to the fact that the back rings would sit on top.  It didn't really look that bad, right?

I posted my pendant to Blue Buddha's facebook page.  Someone there was kind enough to draw my ring path on my photo and put it side by side with a photo showing the correct ring path.  Then it clicked.

I have no idea what I was doing wrong or what I started doing right (they still look the same to me), but it worked!

I quickly (well, I gathered the materials quickly) made another pendant.


I noticed that aluminum rings in the middle were not as tight as the copper rings I had used in the first pendant.  I tried another with brass rings in the middle.


Brass rings were also looser than copper ones.  I liked the way these two looked, so I took the first pendant apart and re-worked it with aluminum rings in the center.


I might try another with copper in the center, just to see if I did something different/wrong on my first try.  Different metals, though, sometimes yield different results, so it might just be that copper rings are tighter than other metals.

I noticed that the last pendant worked up much (much) more quickly than the first and second ones.  I'm excited about that because I want a small army of these things.


I think they will look great as pendants and I want to build necklaces around them.

These are not for the  faint of heart, though.  Each pendant measures about 2 inches in diameter -- pretty substantial.  Luckily, aluminum rings are very light and the pendants are not that heavy.

Sunday, February 2, 2014

New Year's necklace

So, it turns out, that without weekly challenges, I don't post near as often.

Part of that stems from my lack of creative mojo lately and part of that stems from my inability to finish projects (see lack of creative mojo).

Case in point:  I wanted to make a necklace to help me keep my word of the year in the forefront of my mind.

I asked Erin Prais-Hintz to make one of her story beads for me with this quote Henry David Thoreau:

"You must live in the present, 
launch yourself on every wave, 
find eternity in each moment."

That quote was a bit long, so we decided to leave out the middle part.


The bead turned out beautifully and I immediately started on a necklace to showcase it.

And then I started again ...

and again ..

and again.

I wanted this to be "perfect."  You know, drop dead gorgeous, I couldn't imagine anything better, perfect.  Unfortunately, it just wasn't happening.

So, I stopped trying for perfection and just started beading.

I wanted a multi strand necklace, so I made two twisted herringbone ropes.


I finished the necklace with the pendant hanging on the side.  The kiddo took one look  at it and looped it around her neck with the pendant hanging down in the middle.

The kiddo's design sense is usually spot on, so I re-worked a bit.  It turns out, she was right.  Before, it looked like I was trying too hard.  The pendant is also heavier than the beaded ropes, so it had a tendency to pull forward.

I wish I had snapped a "before" photo for you.  Instead, take my word that this is a better design.


The clasp ended up in the front and I like it there.  The pendant hangs nicely in the middle and I can twist it on the headpin to read the entire phrase.

If you haven't already, check out Erin's store.  You can custom order your very own story bead or one of Erin's simple truth pendants.